Are you desperate to try out the Windows 8 Release Preview? Before you jump straight in you need to consider whether it’s an OS you’re ready to commit to using. It’ll try to install itself over Windows 7, or replace Vista or XP completely by default. Not exactly desirable considering there will still be compatibility issues, bugs that need working out, and it’s not actually the final version. Plus this release isn’t going to continue working after the release of the final RTM version, so the likelihood is you would either have to upgrade or revert to continue functionality.
The ideal way to work around this is to dual boot the new Windows 8 preview alongside your current Windows OS. That way you can decided which installation you want to use, as both will work simultaneously, plus you can test run the Windows 8 preview without making a commitment to it, and without losing any files. Here’s our easy how to guide.
Download the files
- The first thing you’ll need to do is download the Windows 8 installer preview from the Microsoft website.
-
After you’ve clicked “Get it now” select the option to download the preview. This will then download the files to your machine.
-
Select the “Run” option both times it pops up, and allow any changes when prompted by the download.
Get ready to install the software
The installation will then scan your machine to make sure that it’s capable of running Windows 8, and to find out whether you will require the 32 bit or 64 bit version. It will then download the files respectively, whilst this part of the installation is running you may need to make a few alterations to your computer. For example clearing space or defragging your hard drive.
Create your bootable Flash Drive or DVD
- On the next screen it’ll ask whether you’re ready to install. Select the option to ‘Install on another partition’, continue through the options (clicking ‘Next’ when required).
-
We will assume you would rather make a bootable flash drive for the purposes of this article.
Click ‘USB flash drive’ then select ‘Next’ again and select your USB from the list. -
Select ‘Next’ and your computer will get to making your disk. Bear in mind this bit can be a bit of a lengthy process.
Make a partition
You’ll now to create that all important partition, so that you have somewhere to install windows 8 on your computer alongside your existing version. Don’t forget to back everything up just in case, since you’re reducing the amount of space your computer has available it makes good sense to ensure you’ve got everything saved out.
- Once you’ve done this, open the Start menu and and right click ‘Computer’, click ‘Manage’ and then choose ‘Disk Management’.
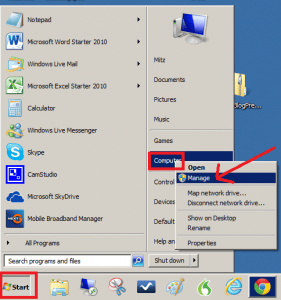
- Right click your hard drive and then choose ‘Shrink Volume’.
-
Windows 8 requires a minimum of 20GB available, so put 20,000 when prompted with ‘Enter the amount of space to shrink in MB’. Then select ‘Shrink’.
-
You’ll then see an unallocated section with 20GB available. This is going to be where you install the Windows 8 release preview.
-
Right click it, the choose ‘New Simple Volume’. Go through the options, clicking ‘Next’ until you reach ‘Volume Label’, in here type ‘Windows 8′.
-
Continue through the options, then select ‘Finish’.
This only works if you have Windows seven. In Windows vista and Windows xp there are different ways to shrink a partition on a hard drive.
Boot from your new Flash Drive
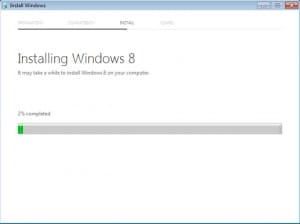
At this point you’ll need to do a restart. You need to boot from the Flash Drive you just created, to do so enter the BIOS, then find ‘Boot > Boot device priority’ and allocate higher priority to the flash drive than your hard drive. Save and exit by pressing the F10 key. At this point the Windows 8 installer should begin. Once setup has loaded click ‘Next’ until you reach ‘Install Now’.
Choose where to install it
When required key in the product code DNJXJ-7XBW8-2378T-X22TX-BKG7J. Keep clicking through the options until you’re prompted to select which type of installation you want to run. Select ‘Custom: Install Windows only’. You’ll then need to select your new partition(named ‘ Windows 8′). Choose ‘Next’ and you’re ready to go.
Boot
After the installation is complete your computer will boot into Windows 8 by default. When you restart you will be prompted with an option to choose which version of Windows you want to boot with, select the ‘Change defaults or choose or other options’ to ensure your previous version is your default installation, but still allow you to test run the Windows 8 preview in anticipation of the full release.
As an Amazon Associate, TechCity may earn a small commission if you shop these products.

OneOdio Wired Over Ear Headphones Studio Monitor & Mixing DJ Stereo Headsets with 50mm Neodymium Drivers and 1/4 to 3.5mm Jack for AMP Computer Recording Podcast Keyboard Guitar Laptop - Black
$27.41 (as of April 18, 2024 06:59 GMT +01:00 - More infoProduct prices and availability are accurate as of the date/time indicated and are subject to change. Any price and availability information displayed on [relevant Amazon Site(s), as applicable] at the time of purchase will apply to the purchase of this product.)
Crayola Ultimate Washable Chalk Collection (64ct), Bulk Sidewalk Chalk, Outdoor Chalk for Kids, Anti-Roll Sticks, Nontoxic, 4+
$9.88 (as of April 18, 2024 06:59 GMT +01:00 - More infoProduct prices and availability are accurate as of the date/time indicated and are subject to change. Any price and availability information displayed on [relevant Amazon Site(s), as applicable] at the time of purchase will apply to the purchase of this product.)
CELSIUS Assorted Flavors Official Variety Pack, Functional Essential Energy Drinks, 12 Fl Oz (Pack of 12)
$22.99 (as of April 18, 2024 06:59 GMT +01:00 - More infoProduct prices and availability are accurate as of the date/time indicated and are subject to change. Any price and availability information displayed on [relevant Amazon Site(s), as applicable] at the time of purchase will apply to the purchase of this product.)
Ernie Ball Regular Slinky Nickel Wound Electric Guitar Strings 3 Pack - 10-46 Gauge
$13.99 (as of April 18, 2024 06:59 GMT +01:00 - More infoProduct prices and availability are accurate as of the date/time indicated and are subject to change. Any price and availability information displayed on [relevant Amazon Site(s), as applicable] at the time of purchase will apply to the purchase of this product.)
Play-Doh Modeling Compound 10-Pack Case of Colors, Non-Toxic, Assorted, 2 oz. Cans, Multicolor, Ages 2 and Up (Amazon Exclusive)
$7.99 (as of April 18, 2024 06:59 GMT +01:00 - More infoProduct prices and availability are accurate as of the date/time indicated and are subject to change. Any price and availability information displayed on [relevant Amazon Site(s), as applicable] at the time of purchase will apply to the purchase of this product.)
Acer Aspire 3 A315-24P-R7VH Slim Laptop | 15.6" Full HD IPS Display | AMD Ryzen 3 7320U Quad-Core Processor | AMD Radeon Graphics | 8GB LPDDR5 | 128GB NVMe SSD | Wi-Fi 6 | Windows 11 Home in S Mode
$299.99 (as of April 18, 2024 07:22 GMT +01:00 - More infoProduct prices and availability are accurate as of the date/time indicated and are subject to change. Any price and availability information displayed on [relevant Amazon Site(s), as applicable] at the time of purchase will apply to the purchase of this product.)
All-new Amazon Fire HD 10 tablet, built for relaxation, 10.1" vibrant Full HD screen, octa-core processor, 3 GB RAM, latest model (2023 release), 64 GB, Black
$104.99 (as of April 18, 2024 07:22 GMT +01:00 - More infoProduct prices and availability are accurate as of the date/time indicated and are subject to change. Any price and availability information displayed on [relevant Amazon Site(s), as applicable] at the time of purchase will apply to the purchase of this product.)
Amazon Fire 8 Kids Tablet | age 3-7 | Learn & play on-the-go with 13-hr battery, parental controls & 1-Year Amazon Kids+ | 32 GB, Blue
$99.99 (as of April 18, 2024 07:22 GMT +01:00 - More infoProduct prices and availability are accurate as of the date/time indicated and are subject to change. Any price and availability information displayed on [relevant Amazon Site(s), as applicable] at the time of purchase will apply to the purchase of this product.)
USB C Docking Station Dual HDMI Monitor,USB C to Dual HDMI Adapter with 2 HDMI Ports,PD Charging,SD/TF,USB A&C 3.0 Ports,USB C Hub HDMI for Dell XPS/HP/Lenovo/Surface/Yoga etc
$39.59 (as of April 18, 2024 07:22 GMT +01:00 - More infoProduct prices and availability are accurate as of the date/time indicated and are subject to change. Any price and availability information displayed on [relevant Amazon Site(s), as applicable] at the time of purchase will apply to the purchase of this product.)